

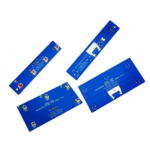

Shop – Miller 250DX Pulser & Sequencer Boards For Sale
I have added a buy now links below, or you can message me at 360 –9 7 5– 3165 and I will be happy to send you an invoice if…
Blog Info, Updates, and Contact Info
Blog Info & Updates Reminder That This is a Living Blog and Blog Posts Are Subject to Edits and Changes! November 2023, the site experienced a crash, prompting the need…
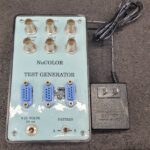
Tektronix Nucolor Test Generator “Peacock Test Generator” Teardown
Tektronix Nucolor Test Generator “Peacock Test Generator” Teardown If anyone Knows any More About this Let Me Know. Live Teardown With Bonus a Firmware Backup. Opened Up Board is Marked…
News: CAMI Research & Right to Repair (Anti Repair)
News: CAMI Research & Right to Repair, The Right to Repair is a current matter of public interest, ensuring consumers and businesses have access to the tools, documentation, and parts…
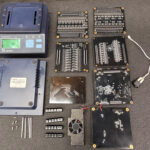
Daihatsu Hijet 89530-87509 / 89530-87511 Transmission Control Unit (TCU) Repair
I don’t see many of the “Tin Can” TCU’s they are a bit more reliable then the Plastic Sealed Daihatsu 89530-87507 86410-2750 TCU’s. But they to are also prone to…
News: Right to Repair Signed In to Law Washington State
Right to Repair Signed In to Law Washington State. On May 20, 2025, Washington Governor Bob Ferguson signed into law two right-to-repair bills: House Bill 1483 and Senate Bill 5680.…
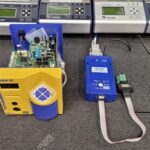
News: Ebay & Privacy Prime Asset Recovery AKA Redbyte Technology
Hello, Everyone. I had been watching a chip programming adapter on ebay for a few months. https://www.ebay.com/itm/297276338584 I Generally do not buy these odd ball adapters until they go below…
News: Aven Tools (Carton) $4,200 SPZV-50 Microscope Not Repairable No Parts Available!
I have been an Loyal Aven Microscope owner and user for 10+ Years, maybe closer to 20. I cannot recall when I got my 1st SPZ-50 but it was a…
Rare Toshiba BM IC Chip Programming Adapters.
These Toshiba IC Chip Programming Adapters Are Rare.. I have Archived the Data Sheets Below. (I Will Add Photos Soon) Toshiba BM Series Adapters. These Adapters Allowed you to Read/Write…
Data I/O 29B Chip Programmers 40 Year Service #righttorepair
The Data I/O 29B programmers have been around for over 40 years, proving their durability and reliability. I’ve decided it’s time to give mine some well-deserved maintenance and Some community…
Xeltek Superpro 6104 Teardown Inspection..
Coming Soon… Xeltek Superpro 6104 Teardown Inspection.. The Xeltek 6104 is Discontinued But Still Updated Uses the 6100N Software and Device List. Photo unboxed with Mega Magic and Magic Chip…
Rare System General Milti Apro Programmer HSP Adapter Sockets
Rare System General Milti Apro Programmer HSP Adapter Sockets These Sockets Are Being sold for Another Chip Programmer that is retiring from the business. I may have some Multi A-pros…